

TP2-3: Module programming and webservices
The aim of this work is to learn basis of module development, using OpenERP, through a single and (quite) complete example. After several progressive steps, you will obtain a new module for the management of a second hand cars garage. The starting point is a nearly empty module, displaying a simple car brands list. Each exercise guides you in order to complete the module. The objective to reach is the management of car brands, car models, and the state of the second hand cars of a garage.
With the following exercises, we are going to learn how module are made through a simple example. Also, one should know that one of the simpliest module of OpenERP is the Idea
module (present in official modules). However, our starting point is going to be even simplier than this module to manage innovative ideas in a company.
A module describing cars (brands, models, …) already exist among the official modules of OpenERP: it is called Fleet
. A good way to do things for experts could be, to develop our module, building it by reusing the classes of Fleet
. But we are not going to do that because we are here to learn, step by step, how modules are made.
Online documentation of the developper for OpenERP, maintained by OpenERP community, can be found at:
http://doc.odoo.com/trunk/developers/server/03_module_dev/
The technical memento, published by Open Object Press and edited by OpenERP S.A., is also a good help for the developper:
OpenERP_Technical_Memento_latest.pdf
Exercice 1 • Car brands list
1.1 Install and run the Idea module
- Start openerp-server (as we did during TP1)
- Run Firefox web browser, and go at OpenERP login page.
- Create a new database, and don't forget to check the option
Load demonstration data

- Activate the
Technical Features
in the access rights of the Administrator user. - Install the module
Idea
. - For the access rights of the Administrator, add him as a user of Extra Tools and then reload the page.
- Explore the Idea module (available from the Tool main menu) and create new ideas and categories.
- Create a new database, and don't forget to check the option
- From a terminal, do:
- chmod -R 777 /opt/openerp/addons/
- Then, launch gedit text editor (Applications > Accessories > Text Editor gedit), and open /opt/openerp/addons/idea/__openerp__.py and try to understand its content. This file, present in each module, describes some meta informations.
- Now open /opt/openerp/addons/idea/idea.py and identify the two Python classes present in it. This file defines the data models of the module, which can be represented like this:

Figure 1.1.1 - Open the file /opt/openerp/addons/idea/idea_view.xml which contains the description of the user interface elements. It can be summarized like this:

Figure 1.1.2 
Figure 1.1.3
1.2 Install and run the nearly empty module (version 0)
- Create a new directory /home/openerp/myaddons
- In this new directory, download and extract secondhandcars-v00.tgz
- Stop the server openerp-server doing
 +
+
- Create a symbolic link with the following command:
ln -s /home/openerp/myaddons/secondhandcars/ /opt/openerp/addons/ - Then, restart openerp-server
- Go back to OpenERP client, and go at Settings > Update Modules List and click the update button.
- Now, go to Settings > Installed Modules, close the filter Installed in the search bar, and look for the Second Hand Cars module.
- Install the module
Second Hand Cars
and explore its views. - Observe the two possible view modes (list and form) for the brands.
- In these 2 views, observe the fields which are displayed for the brands.
- Try to create a new brand.
- Open the file secondhandcars/secondhandcars.py and observe the actual data model. For the moment the only Python class is very simple.

Figure 1.2.1
The aim of this work is to complete this minimal module, step by step, and at the end the data model will grow to become the following one:

Figure 1.2.2 - For the moment, the views described in secondhandcars/secondhandcars_view.xml are the following:

Figure 1.2.3 - Have a look to the demo data (which was loaded when you tried the module) given in the file secondhandcars/secondhandcars_data.xml
- Note also the access rights are described in the file secondhandcars/security/ir.model.access.csv
1.3 Adding new fields to car brands (version 1)
More than the name of the brands, we would like to know the URL of:
- The main page of the international website of the brand
- The main page of the local website of the brand
To do this, you have to edit:
- The Python class of the brands (in secondhandcars.py): add new columns for the new fields
- The 2 views tree and form of the brands (in secondhandcars_view.xml): add the new fields to display
Remark: to have active links in the form view (but not in the tree view!!!), you can add the parameterwidget="url"in the tag <field /> of the websites - The demo data file (secondhandcars_data.xml): add values for the new fields

To test your modifications, the module has to be reloaded in memory. To do so, the server must be restarted. But before restarting the server, you have to firstly uninstall the module. Thus, each time you modifiy the python file of a module, the steps are:
- Uninstall the module
- Restart the server
- Install the module
Note: during all these steps, you don't need to close or to log out OpenERP client. You can keep opened OpenERP page in you web browser. It will not be a problem to continue navigation once the server has restarted.
Once the installation succeeds, try to create of a new brand.
Exercice 2 • Car models list (version 2)
2.1 Create a new OpenERP model and associated views
You are going to create a new Python class for the car models.

The information we want for the business object car is:
| name | The name of the model |
| brand_id | The id of the car brand |
| last_year | The last year of production (can be null) |
A car brand can have several car models, while a car model can have only one (and only one) car brand. The relation between car models and brand models is then a [1-N] relation. Thus, the field brand_id will be a many2one id relation (have a look to the Idea module).
Create the new views for car models (continue adding all views in the same file secondhandcars/secondhandcars_view.xml).

To test your modifications, stop and restart server again.
When re-installation succeeds, create a new car model using the form.
If you want to create demo data for a car model, a specific notation must be used to assign the brand_id field, because it is a many2one relation. Thus, to refer to a brand, you have to write the record like in the following example:
<record model="secondhandcars.model" id="secondhandcars_model_clio">
<field name="name">Clio</field>
<field name="brand_id" eval="ref('secondhandcars_brand_renault')" />
</record>
Exercice 3 • Second hand cars list (version 3)
3.1 Create a new OpenERP model and associated views
You are going to create a new Python class for the cars of the garage.

The information we want for the model of a car is:
| create_uid | The id of the user who created the car |
| immatriculation | The immatriculation code of the car |
| model_id | The id of the car model |
| km_in | kilometers of the car when arriving at the garage |
| km_out | kilometers of the car when leaving the garage |
| price | The price the garage wants to sell the car (will be displayed on the car) |
| doors | The number of doors |
| seats | The number of seats |
| energy | The energy of the engine, among: Gasoline / Diesel / Gaz / Electricity / Hybrid |
The following views will have to be defined:

To help you defining the search view, have a look to how it is made in the Idea module. Then define the following search filters:
- Filter cars with less than 10.000 km
- Filter cars with less than 100.000 km
- Filter cars with more than 100.000 km
- Group cars by model
- Group cars by energy
Once again, don't forget to stop, restart, re-install and test your module. Try each of the filters you have created. Adding some new and different car models may help you to validate your filters.
Exercice 4 • Communication by webservice
OpenERP webservices, thought XML-RPC, allows one to call methods of the ORM in order to create, read, write, search and delete records form a remote program, written in any programming language with XML-RPC support (C, C++, Java, PHP, Javascript, Python, Perl, …).
4.1 Test asking OpenERP webservices from a Python script
Download the script create.py
Open it with gedit and:
- Check that the DB name and the user identication are correctly set to run with your configuration.
- Replace the informations of the partner to create with your identity
Then run the script and check the presence of the new record in OpenERP. (To check the presence, ensure you have the access rights to Sales
. If not, set it and reload the page)
4.2 Test asking OpenERP webservices from a PHP script
First of all, we prepare a web server environment:
- mkdir /home/openerp/public_html/
- su root
- Create the following symbolic link:
ln -s /home/openerp/public_html/ /var/www/mywebsite
Now, as normal user (i.e. not as root user)
- Download the archive Webservices_example_v02.zip and extract its content in: /home/openerp/public_html/
- Change access rights of the directory:
chmod 755 /home/openerp/public_html/webservices_example/ - Change access rights of the files:
chmod 644 /home/openerp/public_html/webservices_example/* - So the URL to use will now be: http://127.0.0.1/mywebsite/
Check the presence of the following files:
- form.html
- vars.inc.php
- login.inc.php
- create_example.php
- search_example.php
- read_example.php
- write_example.php
- unlink_example.php
Open each file (in the order above) with gedit in order to observe the source codes:
- Try to understand the scripts and what it should do.
- Some documentation about the XML-RPC library can be found on PEAR's website:
http://pear.php.net/package/XML_RPC/docs
http://pear.php.net/manual/en/package.webservices.xml-rpc.api.php - Check in the file vars.inc.php that the DB name and the user identication are correctly set to run with your configuration.
Go back to OpenERP client and create 9 new ideas in the module Ideas: 3 will be in draft state (i.e. New), 3 in open state (i.e. Accepted), 2 in cancel state (i.e. Refused) and 1 in close state (i.e. Done).
Now, open the HTML form http://127.0.0.1/mywebsite/webservices_example/form.html (or http://127.0.0.1/mywebsite/form.html if you extracted in a subdirectory) and test the different scripts. Each time, check what happens in OpenERP client.
4.3 Write a webpage showing the list of second hand cars to sell
Now, we would like to display, on the web site, the list (with the immatriculation, km_in and price of the car) of all the second hand cars powered by diesel available in the company.
So, you have to write the web page diesel_cars.php showing this list.
(This work requires the relation secondhandcars.cars (from exercise 3) to be finished. If it is not finished, then just show the list of the brands the company is working with, i.e. the records of secondhandcars.brands)
Exercice 5 • Workflow: states and transitions (version 4)
The workflow engine allows to describe the evolution of documents (model) in time. According to the processing flow and trade logic of the company, some actions can be automatically trigerred by the workflow engine. The workflow mechanism can also help to describe interactions of the document with different actors of the company (e.g. validation steps…), or again to manage interactions between different modules
A classical workflow diagram for OpenERP business objects is the one of the Idea
module, as follow:
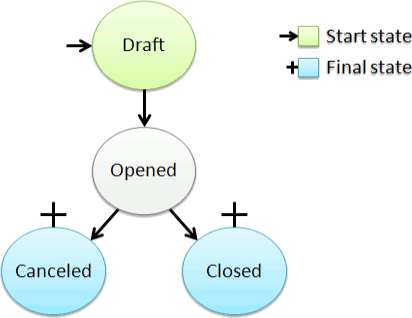
This workflow is defined at different points in the Idea module:
- idea/idea.py : The names of the different states are listed in the field state of the idea_idea class
- idea/idea.py : The four methods idea_cancel(), idea_open(), idea_close() and idea_draft() of the class idea_idea which will be called during transitions.
- idea/idea_workflow.xml : Complete description of the different states (also called activities) and if it is a starting, a normal or a final state. Also, complete description of the possible transitions between these states. Each transition is defined with the signal to listen to trigger the transition and the method (of the business object) to call when the transition is triggered.
Remark: the file idea_workflow.xml is listed in __openerp__.py - idea/idea_view.xml : Each buttons, in the header of the form view of idea, trigger the signal defined in the name parameter when clicked.
5.1 Defining the lyfecycle of the business object car
Inspired by the Idea module, you have reproduce this mechanism for the Second Hand Cars module. For our case, the workflow of a car will be the following:
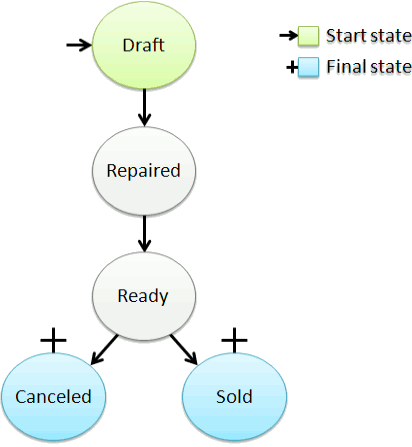
Remark: The repair state cannot be bypassed, because an oil change will always be performed by the garage for the engine of the car.
- Create the file secondhandcars_workflow.xml, modify the files secondhandcars.py and secondhandcars_view.xml
- Add new filters in the search view, in order to filter car to be controlled, to be repaired and those which are ready to be sold.
- Add the fields date_draft, date_repaired, date_cancel and date_sold to the business object car. Modify the methods of the car in order to set the previous dates while the methods will be called.
To get the current date in Python language:
At the begining of the file:
from datetime import datetime
then, you can use the function:
datetime.now()
As done for idea_workflow.xml in the configuration file __openerp__.py of Idea, don't forget to declare the file secondhandcars_workflow.xml in the file __openerp__.py of SecondHandCars.